
Vaulted Ceiling Wall Decor: No-Nail Ideas to Elevate
Key Takeaways
- Plan vaulted ceiling wall decor around eye level, then echo the slope for height without losing balance;
- Use scalable layouts, like diagonal galleries, tall columns, triptychs, and grids, to fit your pitch and furniture;
- Choose damage-free, repositionable frames like Mixtiles to perfect alignment on angled walls, no nails, no mess;
- Finish the look with lighting, paint, and texture to draw the eye up and make tall spaces feel intentional.
Vaulted ceilings give rooms drama, yet they can leave a lot of blank wall. The secret is balancing eye-level comfort with a composition that celebrates the slope. In this guide, you will find planning tips, smart scale, and layout ideas tailored to angled walls, plus how to hang and tweak everything without tools. Whether you like a clean grid or a dynamic diagonal gallery wall, Mixtiles makes vaulted ceiling wall decor effortless, damage free, and fun.
Turn your favorite photo into a statement piece for your vaulted ceiling. Create stunning, personalized canvas prints in minutes. Free shipping and no nails needed.
What makes vaulted ceiling wall decor tricky and exciting?
Vaulted ceilings add height, light, and cathedral scale, which is exciting. The challenge is all that tall wall space competing with everyday eye level. Anchor your focal point near 57 to 60 inches, then build upward to echo the ceiling pitch. This keeps the living room, dining room, or bedroom feeling grounded while celebrating the slope, beams, and natural light.
If you want a deeper dive into placement height, check out our guide on how high to hang art on a wall.
How do you plan a vaulted wall so it looks balanced from every angle?
Start with measurements and a clear anchor line, then scale your artwork to furniture. Choose a cohesive photo story so your gallery reads as one decorative feature rather than scattered pieces.
Measure the pitch and set your anchor line
Find seated eye level at roughly 57 to 60 inches from the floor and mark a light painter’s tape line. Note the direction of the vaulted ceiling and the highest point. This defines where your layout can “grow” toward the slope while keeping your main art at a comfortable viewing height.
Match scale to your furniture
Keep galleries within the width of your sofa, console, or fireplace surround. For small rooms, use fewer, larger tiles for a clean, modern look. For large living rooms with high ceilings, add height with vertical stacks or a long diagonal that follows the pitch.
For more help choosing proportions for tall spaces, use our wall art size guide.
|
Wall Width |
Ceiling Height |
Suggested Tile Size |
Typical Count |
Ideal Spacing |
|---|---|---|---|---|
|
6–8 ft, 1.8–2.4 m |
9–10 ft, 2.7–3 m |
12 × 12 in, 31.6 × 31.6 cm |
6–9 tiles |
1.5–2 in, 4–5 cm |
|
8–10 ft, 2.4–3 m |
10–12 ft, 3–3.6 m |
12 × 16 in, 31.6 × 41.75 cm |
6–12 tiles |
2 in, 5 cm |
|
10–12 ft, 3–3.6 m |
12–16 ft, 3.6–4.9 m |
20 × 20 in, 49.5 × 49.5 cm |
6–9 tiles |
2–3 in, 5–7.5 cm |
|
Over 12 ft, 3.6 m+ |
16 ft+, 4.9 m+ |
20 × 27 in, 49.5 × 68.6 cm |
3–6 tiles |
3 in, 7.5 cm |
Choose a focal photo story
Pick a theme that suits your interior style. Modern black and white for clean, minimal walls; rustic wood and green landscapes for farmhouse or wood wall accents; bold color for a contemporary home. A couple of hero images plus supporting photos will feel intentional. Canvas pictures or fine art prints are great for a single oversized focal point.
Ready to experiment without commitment? Our repositionable photo tiles let you perfect your layout. Order your first set today and see how easy it is.
Which vaulted ceiling wall decor layouts work best with photo tiles?
Layouts that mirror or balance the slope work best. Follow the pitch with a diagonal, rise in tall columns, or anchor a grid at eye level for a tidy, gallery-like finish. For additional layout formulas and spacing tips, see how to arrange art on a wall.
Diagonal pitch-following gallery

Stair-step tiles so the top edge climbs with the ceiling. This creates a stunning focal point that draws the eye upward while keeping the bottom row anchored above a sofa or console in the living room.
Tall twin columns

Build two vertical stacks that frame a fireplace, media unit, or tall windows. This emphasizes height without overwhelming width. It works well in long rooms and libraries with high ceilings.
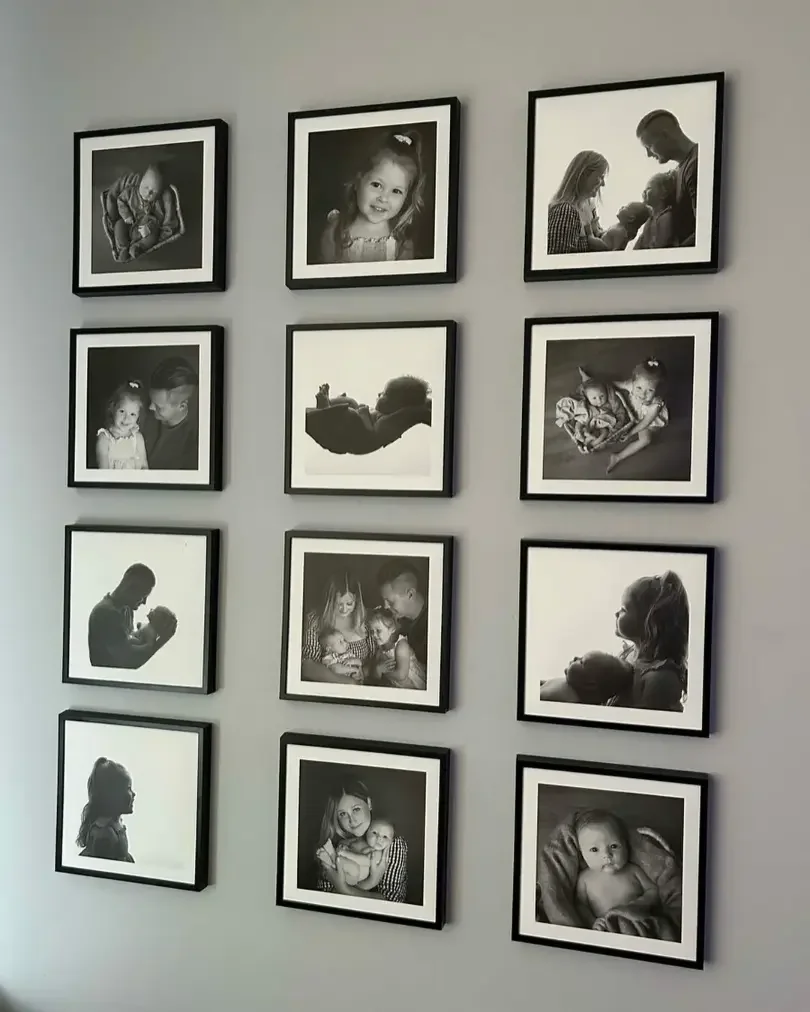
Oversized triptych or 3x3 grid

Choose three large canvas prints for a calm statement, or a 3x3 grid for symmetry. Keep spacing consistent for a clean, modern finish. Great over a dining table or in a bedroom with a vaulted ceiling.
Sofa-backed staggered grid

Start a tidy row at eye level above your furniture, then taper one or two tiles upward to echo the slope. This balances everyday viewing comfort and the dramatic ceiling wall.
How do you hang decor on angled, tall walls without damage or tools?
Use lightweight, adhesive, and repositionable wall photo tiles. Mixtiles stick securely to painted walls, many wallpapers, and wood paneling, and they can be moved cleanly. Renters and homeowners alike can follow our tutorial on how to hang wall art without nails.
Why adhesive, repositionable frames beat nails
No studs needed, no patching later. Ideal for renters and plaster or drywall. Mixtiles are light, so they are easy to place high on tall walls. They also work well where you need micro-adjustments for perfect lines on a slope.
Step-by-step hanging flow with Mixtiles
- Wipe the wall clean and lightly tape an eye-level baseline;
- Place the center tile first, align to furniture or mantle, then press firmly;
- Build outward and upward, mirroring the pitch with consistent spacing;
- Step back, adjust, and re-stick tiles until the composition feels balanced;
- Add picture lights or sconces to highlight your new focal point.
Pro spacing tips for vaulted ceilings
Use 1.5 to 2 inches between small to medium frames, and 2 to 3 inches for large tiles. Keep edges parallel to furniture for a calm baseline. When following the pitch, match the slope angle so the rise reads intentional.
What colors, lighting, and finishes complete vaulted ceiling wall decor?
Unify the ceiling and walls with thoughtful paint, then layer lighting and texture. This makes the room feel cohesive and highlights your artwork.
Paint and tone
Match ceiling and wall in soft white for a seamless cathedral feel, or try a deep accent wall that makes light frames pop. Black frames add crisp contrast; wood frames feel warm and rustic. Green or dark hues can anchor a modern farmhouse style.
Lighting that lifts
Use uplights, picture lights, or sconces to emphasize height and color. Warm light at 2700 to 3000K flatters skin tones in photos and adds cozy glow in the kitchen, dining area, or living rooms.
Texture and materials
Balance smooth artwork with beams, wood accents, or subtle wallpaper. Keep surfaces clean and uncluttered so the high ceilings read as an intentional design feature.
Why choose Mixtiles for vaulted ceiling wall decor?
Mixtiles makes it easy to create, hang, and refine large-scale galleries at home with no guesswork.
- Lightweight, adhesive, and repositionable frames that remove cleanly;
- Web and app tools to upload photos, try borders, and preview frames in different colors;
- Gallery Wall Kits, Canvas Prints, Wall Signs, and Fine Art options for any style;
- Fast shipping, helpful support, and layouts that work in small or large spaces.
Vaulted ceilings deserve decor that celebrates their height without losing everyday comfort. Start at eye level, select a layout that echoes your slope, and scale confidently. With Mixtiles, you can experiment, fine-tune alignment on angled ceilings, and swap photos anytime. Your vaulted ceiling wall decor will look designer-made and feel uniquely yours.
Ready to transform that big blank slope? Browse our photo gallery wall ideas for inspiration and design your own today. Enjoy free shipping.
Frequently Asked Questions
What height should artwork start on a vaulted wall?
For comfortable viewing, center main pieces at 57 to 60 inches from the floor. Use that eye-level baseline to anchor your arrangement, then continue upward to reflect the ceiling pitch. Keep the bottom row aligned to furniture width for balance.
Which layouts work best with a vaulted ceiling?
Diagonal galleries that track the slope, tall twin columns, oversized triptychs, or tidy grids anchored at eye level all complement vaulted ceilings. Choose a layout that fits your room width, and let the composition rise toward the peak to emphasize height without feeling top heavy.
How do I choose art size and spacing for tall walls?
Scale art to nearby furniture, ideally two-thirds to three-quarters of its width. In very tall rooms, use fewer, larger pieces to avoid visual clutter. Maintain consistent gaps, about 1.5 to 2 inches for small frames, and 2 to 3 inches for large pieces.
How can I hang decor on angled walls safely and cleanly?
Choose lightweight frames and removable adhesive strips or hooks to avoid drilling. Mark an eye-level guide with painter's tape, place the center piece first, then build outward with a level or laser. Step back often, adjust spacing, and refine alignment to match the slope.
Be the first to know — deals, news & decor ideas.
By clicking you agree to the Terms of Use & Privacy Policy